


Finding the best-performing machine learning model can be a time-consuming process, often involving trial and error. Rather than manually testing and evaluating various configurations, you can streamline the process using Automated Machine Learning (AutoML). With AutoML, you can automatically explore multiple preprocessing methods and algorithms, identifying the best model for your needs.

What is AutoML?
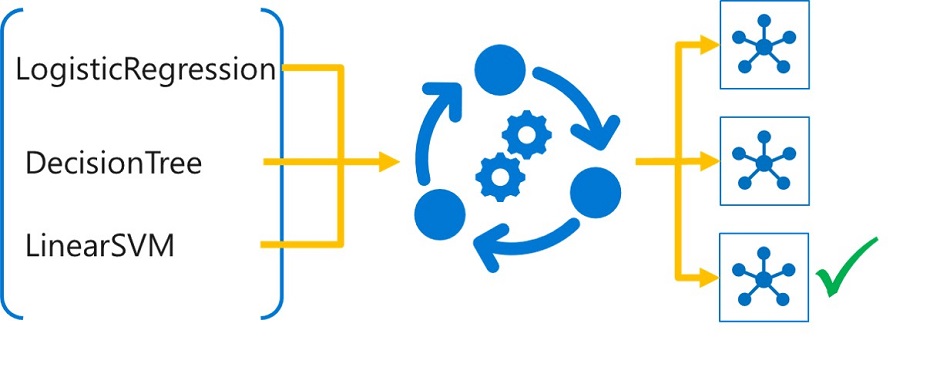
AutoML is a powerful tool that allows you to automate the process of training and evaluating models. Whether your goal is classification, regression, forecasting, image classification, or natural language processing, AutoML can handle it. Imagine you want to find the most accurate classification model for your dataset. You can use AutoML through Azure Machine Learning Studio’s visual interface, command-line interface (CLI), or Python SDK.
Getting Started: Setting Up AutoML for Classification
Before you can run an AutoML experiment, it’s crucial to prepare your data. For classification models, the only requirement is to provide the training data. Here’s how to do it:
- Prepare Your Data: Create a data asset in Azure Machine Learning. Store your data in a folder and create an MLTable file that includes the data schema. This MLTable data asset serves as input for AutoML.pythonCopy code
from azure.ai.ml.constants import AssetTypes from azure.ai.ml import Input my_training_data_input = Input(type=AssetTypes.MLTABLE, path="azureml:input-data-automl:1") - Preprocessing with AutoML: AutoML applies essential preprocessing steps like scaling and normalization automatically, ensuring that no single feature skews the model’s training. You can further customize this by enabling imputation for missing values or encoding categorical data.
Configuring and Running an AutoML Experiment
Once your data is ready, configuring the AutoML experiment with Python SDK allows for more flexibility. Here’s an example of setting up a classification job:
pythonCopy codefrom azure.ai.ml import automl

# Configure the classification job
classification_job = automl.classification(
    compute="aml-cluster",
    experiment_name="auto-ml-class-dev",
    training_data=my_training_data_input,
    target_column_name="Diabetic",
    primary_metric="accuracy",
    n_cross_validations=5,
    enable_model_explainability=True
)
The primary_metric setting is vital, as it defines the metric AutoML will use to determine the best model. Azure supports a variety of metrics, such as accuracy, precision, and recall, to match your specific needs.
Control and Optimize Your Experiment
AutoML experiments can run on compute resources, which makes it essential to manage costs and time. To do this, you can set parameters like:
timeout_minutes: Defines how long the entire experiment can run.trial_timeout_minutes: Limits the time a single trial can take.max_trials: Specifies the maximum number of models to test.enable_early_termination: Stops the experiment early if the model performance isn’t improving.
Example configuration:
pythonCopy codeclassification_job.set_limits(
    timeout_minutes=60,
    trial_timeout_minutes=20,
    max_trials=5,
    enable_early_termination=True
)
You can also run multiple trials in parallel using a compute cluster, making the process even faster.
Submitting and Monitoring Your AutoML Experiment
Once configured, submitting an AutoML job is simple:
pythonCopy code# Submit the AutoML job
returned_job = ml_client.jobs.create_or_update(classification_job)
After submission, you can monitor the experiment through Azure Machine Learning Studio. The platform provides a direct link to track progress and review results.
Why Choose AutoML?
AutoML simplifies the model selection process by automating data preprocessing, algorithm selection, and hyperparameter tuning. It saves you time, ensures consistency, and enables you to focus on what matters most: interpreting results and refining models.
Whether you’re a beginner or an experienced data scientist, AutoML in Azure Machine Learning can help you leverage the power of machine learning without the need for deep expertise in every algorithm. So, take the leap and start your journey towards smarter, faster model development today.
Evaluating and Comparing Models in Azure AutoML
After an AutoML (Automated Machine Learning) experiment completes, the next step is to review the trained models and select the best one for your needs. In Azure Machine Learning Studio, this process is straightforward and provides insights into each model’s performance.
Navigating the AutoML Results
To get started, open your AutoML experiment in Azure Machine Learning Studio and explore its details. On the Overview page, you’ll find key information, such as the input data asset and a summary of the best-performing model. For a deeper dive into all the trained models, head over to the Models tab.
Understanding Preprocessing Steps
If you enabled featurization during your AutoML experiment, Azure’s data guardrails come into play. These guardrails ensure your data is ready for training by addressing common issues. For classification models, the data guardrails include:
- Class balancing detection
- Missing feature values imputation
- High cardinality feature detection
Each guardrail may show one of three states:
- Passed: No issues detected, no further action needed.
- Done: Changes were applied to your data. It’s recommended to review these adjustments.
- Alerted: Issues were detected that couldn’t be automatically fixed. You’ll need to review and address these manually.
In addition to these guardrails, AutoML applies scaling and normalization techniques automatically, ensuring the model training is balanced. You can see which technique was applied in the Algorithm Name column, such as MaxAbsScaler for scaling or LightGBM for the classification algorithm.
Retrieving the Best Model
Azure Machine Learning Studio makes it easy to find the best-performing model. Models in the Models tab are sorted automatically by the primary metric you specified during the experiment setup, placing the best run at the top.
For a more customized view, you can adjust the columns displayed to include other metrics, helping you create a comprehensive comparison of models. This flexibility allows you to make informed decisions based on a variety of performance indicators.
Exploring Model Interpretability
Model explanations provide valuable insights into how each feature influences the predictions made by the model. During the AutoML experiment setup, you can configure it to generate explanations for the best model automatically. If you’re interested in understanding another model’s behavior, you can select it from the overview and click Explain model.
Note: Explaining a model helps approximate its interpretability by estimating how much each feature influences the predicted outcome. Learn more about model interpretability.
Tip: Want to dive deeper into evaluating AutoML runs? Click here to learn more.
This blog post is based on information and concepts derived from the Microsoft Learn module titled “Find the best classification model with Automated Machine Learning.” The original content can be found here:
https://learn.microsoft.com/en-us/training/modules/find-best-classification-model-automated-machine-learning/
Deixe um comentário Cancelar resposta